TableLayout
Last updated at 8:39 am UTC on 4 May 2022
A TableLayout is a LayoutPolicy.
The TableLayout supports laying submorph 'cells' in a table format - rows and columns, in contrast to LayoutFrame which provides simple proportional layout.
The use of TableLayout is also explained in MorphLayoutArticle.
You set a primary direction for the layout with
- listDirection:
- leftToRight
- rightToLeft
- topToBottom
- bottomToTop
Demo
The secondary direction is set by
- wrapDirection: describes the direction along which a list-like layout should be wrapped. This direction must be orthogonal to the list direction, that is if listDirection is #leftToRight or #rightToLeft then wrapDirection must be #topToBottom or #bottomToTop and vice versa. Possible values are:
- leftToRight
- rightToLeft
- topToBottom
- bottomToTop
- none (can make for very odd results, typically no wrapping at all)
Cells along the primary direction are 'centred' (another confusing usage, the text-editor phrase 'justify' might be more understandable) according to
- listCentering:
- topLeft - start at primary direction origin and work away; gets confusing if your list direction is rightToLeft
- bottomRight -start at end of primary direction and work towards origin
- center - center the packed column in the middle of primary direction
- justified - insert extra space inbetween rows/columns, spreading them out evenly
TableLayout listCentering demo
'Centering' (or justifying, just as above) across the secondary direction is set by
- wrapCentering:
- topLeft - center at start of secondary direction
- bottomRight - center at end of secondary direction
- center - center in the middle of secondary direction
- justified - insert extra space inbetween rows/columns
Rows can be required to all be the same size with listSpacing: #equal. Using #none allows rows to have varying heights (remember this is all modified by the choice of primary direction)
The smallest and largest size for cells within the table can be set
- minCellSize:
- maxCellSize:
Both accept a Number or Point.
Cell positioning within the container can be modified with
- cellPositioning:
- topLeft
- topRight
- bottomLeft
- bottomRight
- topCenter
- leftCenter
- rightCenter
- bottomCenter
- center
Inter-morph spacing
You can require some gutter space between morphs without needing to insert spacers
- layoutInset: provides a gutter from the edge of the receiver to the outer bounds of where submorphs will go. The arg can be a Number, Point or Rectangle
- cellInset: which will leave a border around each cell; again, a Number, Point or Rectangle works.
- spaceFillWeight: - you can add importance to a morph that is spaceFilling so it gets more share of the spare room being spread around. Arg is a Number that is used in each spaceFilling direction.
The way the receiver fits within its parent can be changed as well;
- hResizing:
- vResizing
- rigid - the height/width is fixed and set by directly using height: or width:
- shrinkWrap - the morph will shrink to fit as tightly as possible around all its submorphs
- spaceFill - the morph will expand to fill as much space as required in its parent morph.
You can have a morph containing a number of submorphs where one or more is rigid in one direction or another, one or more is spaceFilling etc.
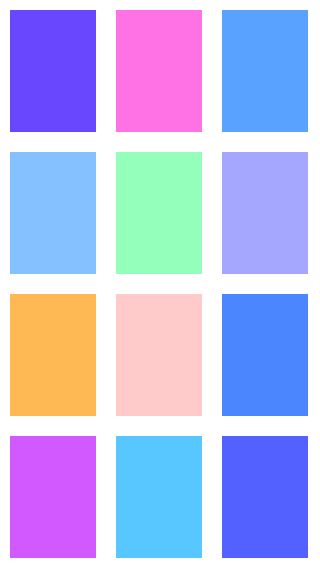
| container side cell |

side := 320.
 container := Morph new.
 container width: side.
 container height: side * (4/3) * (4/3).
 container color: Color white.

 container layoutPolicy: TableLayout new.
 container listDirection: #leftToRight.
 container wrapCentering: #topLeft.
 container wrapDirection: #topToBottom.

 1 to: 12 do:  [:i |  cell := Morph new.
                   cell height: (side/3) *(4/3).
                   cell color: Color random twiceLighter twiceLighter twiceLighter.
                   cell width: (side/3) .
                   cell borderWidth: 10.
                   cell borderColor: Color white.
                   container addMorphBack: cell
                 ].

container openInWorld.

Try out -
 |r e s b |
r := RectangleMorph new.
r color: Color gray.
r position: 10@10.
r extent: 150@200.
r name: 'background'.
r openInWorld.

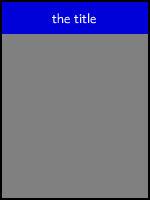
OK, now configure our background so that it uses the TableLayout.
r layoutPolicy: TableLayout new. "lay out contents as a table"
r listDirection: #topToBottom. "how we want to place the contents"
r listCentering: #topLeft. "start list at the top"
r wrapCentering: #center. "each item is in the center"
As the layoutPolicy has been set we can now put something inside:
a morph s which contains a StringMorph.
s := Morph new.
s layoutPolicy: TableLayout new. "lay out contents as a table"
s listDirection: #topToBottom. "how we want to place the contents"
s listCentering: #center. "start list at the top"
s wrapCentering: #center. "each item is in the center"
s hResizing: #spaceFill.
s color: Color blue twiceDarker.
s height: 32.
title := StringMorph new
		contents: 'foo';
		color: Color white.
r addMorph: s. "note that the new item goes at the top"
s addMorph: title.

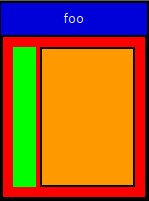
Now let's add another morph called b (red color) to the background r.
b := RectangleMorph new.
b layoutPolicy: TableLayout new.
b listDirection: #leftToRight.
b listCentering: #topLeft.
b wrapCentering: #topLeft.
b vResizing: #spaceFill.
b hResizing: #spaceFill.
b color: Color red.
b layoutInset: 10@10.
b cellInset:4@0.
r addMorphBack: b.
e1 :=  Morph new.
e1 width: 23.
e1 vResizing: #spaceFill.
e1 hResizing: #shrinkWrap.
e1 color: Color green.
b addMorphBack: e1.
e2 :=  RectangleMorph new.
e2 vResizing: #spaceFill.
e2 hResizing: #spaceFill.
e2 color: Color orange.
b addMorphBack: e2.
The final result

There are a number of other facilities needing explanation, too -
- cellSpacing: - the arg has to be one of-
- globalRect
- globalSquare
- localRect
- localSquare
- none
I invite you to work out what they do and how to explain that to the rest of us
- disableTableLayout:
- rubberBandCells: - look at the implementation of it and work it out...
Change from Squeak 5.2 to 5.3 – #cellInset: / #cellGap:
The method #cellInset: changed in Squeak 5.3. It has to be replaced with #cellGap: to get the same effect.
Details see
Layout of a simple table (cellInset)
Examples
example7: flow layout implemented with a TableLayout
TableLayoutExample with 100 squares
How to lay out submorphs - example 5 - bar chart
Multiplication table (TableLayout example)
TableLayout and CSS Flexbox layout
The TableLayout policy is similar to the CSS Flexbox layout arrangment.
CSS Flexbox layout
https://www.w3.org/TR/css-flexbox/#intro
The 'flex-direction' property defines the main axis –the direction in the flex items are placed.
The default property is 'row', the others are 'row-reverse', 'column' and 'column-reverse'.
Items in a flexbox layout are arranged in one row or column, no wrapping. The default value of the 'flex-wrap' property is 'nowrap'. The other possible values are 'wrap' and 'wrap-reverse'.
https://www.ostraining.com/blog/webdesign/css-flexbox-basic-concepts/
On-line demos
https://flexgenerator.com/
http://www.csstutorial.org/flex-both.html
https://flexbox.help/


