Squeak
  links to this page:    
View this PageEdit this PageUploads to this PageHistory of this PageTop of the SwikiRecent ChangesSearch the SwikiHelp Guide
StackMorph Tutorial
Last updated at 2:33 am UTC on 9 December 2011
This tutorial is for Squeak version 3.6 (90% of this tutorial, is based on a tutorial by Ted Kaehler, which was from the original demo by Scott Wallace. Scott wrote the code in class StackMorph.)

Updated! for Squeak 4.2. Added some new content and formatted the example to make it a little more readable. I'm not the original author ?, just added to it. – Stephen Smith

The Stack and Card model used by HyperCard is flexible and compelling. A user sees one Card at a time. It is a composite of Card-specific data and objects, over a background. The background gives the Card its "look". There can be multiple backgrounds in a Stack. Cards of different backgrounds can be intermixed and appear in any order.

In Squeak's version of a Stack, we have some additional features:

Get the Stack Flap

You may already have the "Stack Tools" flap at the bottom of your screen. If not, click in the empty space to the right to get a World menu. Choose "flaps...". If the menu has check boxes, turn on "Stack Tools". If not, choose "show shared flaps". Then get the menu again and turn on the "Stack Tools".

Create a Stack

Open the "Stack Tools" flap. On the far left is a blank stack. Drag it out onto the screen. This new stack has one card, which has nothing in it. One thing I found confusing was how to resize the stack. To resize the stack, use the card's yellow halo not stack's yellow halo. I don't know why the stack's yellow halo doesn't work for this.

Note: In 4.2 the stack's yellow halo works as expected. You can still use the card's yellow halo - either seems to produce the same result (i.e. resizing the stack).

The Stack Controls

Across the top of the Stack are a set of control buttons. Here is what they do:

- Delete this Card.
<<Turn to the first Card of the Stack.
< Turn to the previous Card.
Bring up a menu of commands. It is called the Stack Menu.
§ Show designation button. (Will be discussed below)
> Turn to the next Card.
>> Turn to the last Card.
+ Add a new card (it will have the current background).
Diamond Show fewer controls. Press it again to see all of the controls again

The entire set of controls can also be hidden. Choose "hide page controls" from the Stack Menu.

From the Stack Tools flap, pull out the Stack Help object and place it on your World (i.e. current project desktop). Read through the Stack Help for an overview of how to use the stack and then return to this tutorial.

Let's Build a Personal Database


Options - Enhance Your Database


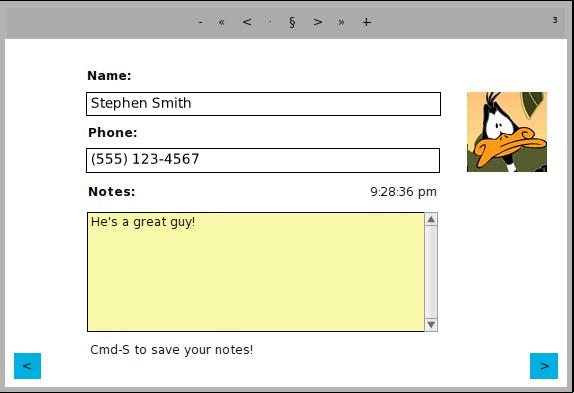
When you're done it should look something like this:

Stack1.jpeg

More to come...


Older stuff...

Initially these will be notes on what I have learned from experimenting with creating a stack using StackMorph.
Question: How does one make a textMorph a data item on the background (orange designation) using direct manipulation?

Answer: I found my answer in the stack help file on the Stack Tools flap (which I didn't know existed before). If the image does not have a Stack Tools flap, open the World menu and select flaps. Another menu appears which lists all the flaps available, with selection buttons next to each; select the Stack Tools flap and the flap magically appears. Then you can drag out the Stack Help morph.

You first have to place a morph which supports text on the background by using the stack/cards menu and select "place onto background".

Then to have the data morph be seen on every card, with each card having its own value, use the stack/cards menu and select "start holding separate data for each instance". Now you can add different text data on each card.

If you use a Scrolling Text morph, the border will turn red when you enter text; be sure to type Cmd-s to save the text in the Scrolling Text morph before you go to another card or else your text will be erased. –Dave Raftery