DOC's Demo's - K8055 Interface
Last updated at 10:15 am UTC on 10 April 2008
This is part of a (loosely connected) set of beginners tutorials done by a beginner (shock, horror). The entry point for these tutorials is DOC's Demo's
- Abstract: A class is created to interface with with the Velleman K8055/VM110 Interface Card using FFI.
- Prerequisites: basic Smalltalk and Squeak knowledge. An actual K8055 would help ;-)
- Keywords: hardware DLL FFI tutorial beginner
- Squeak: v3.8 v3.9
- Package: http://www.squeaksource.com/K8055
- Platform: MS Windows XP (probably other versions)
05/01/07 NB: After initially creating this page I had a rethink on how to organise things. I have now renamed the class to "K8055" and moved all methods to the class side because a) the API should be "hidden away" and b) since the class represents a hardware resource (or rather the single API route to the hardware) I don't think it makes sense to "create an instance" at this level. I still however intend to have a "K8055Dev" class to represent an individual card, at least initially. Thinking beyond the code to replicate Vellemans diagnostic program, it could be argued that a "K8055Dev" class is a misnomer because it serves only to represent the physical grouping of a bunch of I/O, and that in practise different objects may want ownership of different I/O on the same card. No surprise if you consider for example one card accessed via two objects, one reading temperature via an analogue channel and turning a fan on/off via a single digital channel, and another object say measuring light levels and switching lights on/off in a similar manner. Both objects would coexist without knowledge of each other, just happening to use I/O that just happens to be on the same card. In summary, applying good OOD, each individual I/O channel would be represented as individual objects. Any comments on this most welcome!
Contents
- Introduction
- Low Level API
- API Test/s
- Device Emulation
- Some Head Scratching
- Squeak Interface
- GUI
1. Introduction

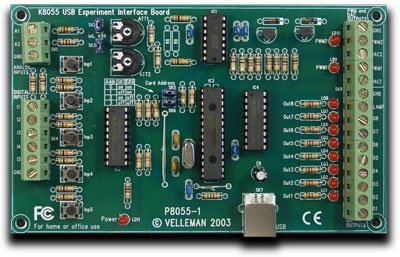
The Velleman K8055/VM110 is an interface card that you plug into a USB port and that provides various digital and analogue input/outputs along with some other features. It's dumb but cheap. Below is a summary of the cards features and you can read more about the card here: http://www.velleman.be/ot/en/product/view/?id=351980
- 5 digital inputs (0= ground, 1= open) (on-board test buttons provided)
- 2 analogue inputs with attenuation and amplification option (internal test +5V provided)
- 8 digital open collector output switches (max 50V/100mA) (on-board LED indication)
- 2 analogue outputs:
    -- 0 to 5V, output resistance 1K5
    -- PWM 0 to 100% open collector outputs max 100mA / 40V (on-board LED indication)
- general conversion time: 20ms per command
- diagnostic software with DLL included
- Upto four cards can be used at the same time
- The "address" of individual cards are user selectable via onboard jumpers
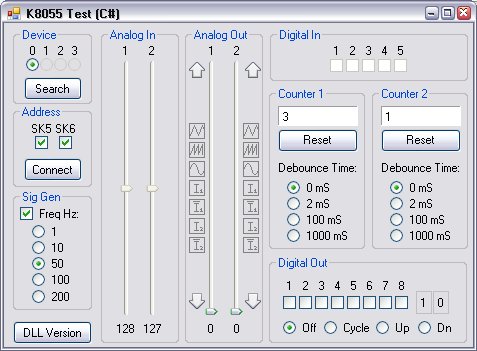
The objective of this tutorial is to show how to use the card via Squeak. Initially only the most simple and direct method of talking to the card is presented (API level). After this we build on the API to reproduce the diagnostic GUI supplied by Velleman plus some additional functionality I added for a C# version (see below and: http://www.doconnel.force9.co.uk/csharp/k8055/). The C# version was put together quickly and in it the card-interface code is somewhat coupled to the GUI code. I hope to avoid this situation for the Squeak version not just because it is "bad form" but also because at this stage I have no idea of the best way to create a GUI in Squeak :-))) An additional reason is that I eventually want to control four cards as one, ie, without referring to each individual card. Instead, at a conceptual level, each additional card should/will simply appear as additional IO channels. Now here is the catch: I only have two of these cards so I want to emulate the other two so I can test a full complement. So now it makes sense to create a card emulator before attacking the GUI. This also has the advantage that (eventually) you should also be able to experiment with the results of this tutorial even if you do not actually own a Velleman K8055/VM110. The sun shines and everyone is deliriously happy.

My personal aim in this tutorial is to get as far as reproducing my C# GUI. Depending on time/interest I will decide later how far I want to continue beyond this point. However, feel free to use any of the results as you want with the proviso that I devoid myself of any responsibility for how you use it. In other words: if you are stupid enough to use my code and one of these cards to control a nuclear power station and it goes into meltdown... don't call me, not my problem, okaaaaaay. Likewise, hoover, xmas lights, robot, whatever... double-double check that code performs as expected before hooking anything up to hazardous equipment. The sun shines and I too am deliriously happy.
2. Low Level API
Velleman provide a DLL to make it easier to write your own programs to control their card. The functions provided by the DLL are pretty much straight forward and self-explanatory but to make them easier to digest I have put them into functional groups below...
	Device/Misc

		long OpenDevice(long CardAddress)
		void CloseDevice(long CardAddress)
		long SearchDevices()
		long SetCurrentDevice(long lngCardAddress)
		void Version()

	Analogue I/O

		long ReadAnalogChannel(long Channel)
		void ReadAllAnalog(long *Data1, long *Data2)
		void OutputAnalogChannel(long Channel, long Data)
		void OutputAllAnalog(long Data1, long Data2)
		void ClearAnalogChannel(long Channel)
		void ClearAllAnalog()
		void SetAnalogChannel(long Channel)
		void SetAllAnalog()

	Digital I/O

		void WriteAllDigital(long Data)
		void ClearDigitalChannel(long Channel)
		void ClearAllDigital()
		void SetDigitalChannel(long Channel)
		void SetAllDigital()
		bool ReadDigitalChannel(long Channel)
		long ReadAllDigital()

	Counter I/O

		long ReadCounter(long CounterNr)
		void ResetCounter(long CounterNr)
		void SetCounterDebounceTime(long CounterNr, long DebounceTime)
The list appears fairly complete but there are some "gotcha's" waiting for us further down the line. For now just note that output states can only be set not read and that the I/O functions do not include any parameters to target a specific card, "SetCurrentDevice(long lngCardAddress)" must be to used for this. We will tackle these later.
Squeak includes the "Foreign Function Interface" (FFI) which provides an easy way to call functions in DLLs. Below I show a sample of converting some of the above into Smalltalk methods which use the FFI (see the Swiki for detailed FFI information). If you are doing this yourself, as opposed to loading in the change-set, you will first need a class to contain these methods. I created a new class-category called "K8055", then an actual class called "K8055" and then on the class-side a method-category called "api". The following three methods encapsulate most of the detail of using FFI...
	apiOpenDevice: cardAddress
		"long OpenDevice(long CardAddress)"
		<apicall: long 'OpenDevice' (long) module: 'k8055d.dll'>
		^self externalCallFailed

	apiCloseDevice
		"void CloseDevice (void)"
		<apicall: void 'CloseDevice' (void) module: 'k8055d.dll'>
		^self externalCallFailed

	apiReadAllAnalogChan1: aData1 chan2: aData2
		"void ReadAllAnalog(long *Data1, long *Data2)"
		<apicall: void 'ReadAllAnalog' (long* long*) module: 'k8055d.dll'>
		^self externalCallFailed
Some notes:
- The actual DLL function names are used as the basis for method naming, prefixed with "api" (informal FFI convention)
- Where appropriate: method names are postfixed with the name of first argument, eg, "apiReadAllAnalogChan1" (a Smalltalk convention typically with methods having two or more arguments)
- The first line is a comment containing the DLL function specification (convention?)
- The actual FFI call is implemented between "<" and ">".
- An FFI call has three parts: calling-convention, function-specification, module-name
- On MS Windows the calling-convention is typically "apicall" (see FFI documentation for alternatives)
- The module-name is the DLL file name (eg, module: 'k8055d.dll')
- The function-specification is formed by dropping the DLL argument names, leaving only argument-type and single quoting the DLL function name.
- Note the asterisks to indicate "pointer to" for example in method "apiReadAllAnalogChan1" where the DLL function expects pointers to LONG's. In Smalltalk everything is by reference anyway but to "objects" not specific types like LONG (even though an object may represent a LONG). Here the FFI facilitates the DLL function and ensures the results end up in the variables (objects!) supplied to the methods. In other words: for simple types you do not have worry about converting between smalltalk objects and simple types, FFI does it for you!
- Finally, in normal circumstances when the method is called, FFI handles the DLL function call and returns with the results. However, should the FFI call fail, eg, the DLL itself was not found, then the method falls through to the last line in all the methods, ie, "^self externalCallFailed". Note this is an FFI failure not a DLL function failure. The latter case is handled in the same way as any other language, typically by detecting an error condition via the DLL function return value (if any) and by reference to documentation provided by the DLL's creator.
3. API Test/s
This section is only useful to those of you who actually have one of these cards, others will have to wait to later when we have an emulator (so stop your mumblings of discontent now!).
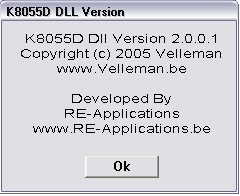
With the K8055 class and the FFI methods we can perform a small initial test. Open up a Workspace window, enter the following and do-it (without quotes): "K8055 apiVersion". All being fine you should get something simliar to this:

If the DLL was not found by the FFI you will get "Error: Unable to find function address". Notice the second line in the main part of the windows says "ExternalFunction class>>externalCallFailed". This is what we told all the methods to return if the FFI call fails and "falls-through" to the last line (see above). Either the DLL simply does not exist on your computer or it is not in a directory reachable by FFI/Squeak. Best action is to get the DLL and put it in a directory specified in the PATH environment variable (MSWin). Alternatively put a copy in the Squeak directory. If it still fails then check the method itself for typo's.
If the call succeeded then a dialog should be displayed showing the DLL version and some other information. This dialog is entirely generated by the DLL itself as a result of calling the DLL function "Version()". No arguments are needed and no result is returned. Note especially though that while the dialog is displayed you have no control over Squeak. You can switch back to Squeaks window but Squeak remains unresponsive. This happens because the call to the DLL is "blocking", ie, it only returns when it has performed it's job... and that is only complete after you press "OK" on the dialog and it has closed. You may think this is no big deal because you are unlikely to call the apiVersion method very often... but what about other things that Squeak may be doing?
To demonstate the problem close the dialog and in Squeak drag out the "Clock" object from the "Supplies" flap and put in somewhere viewable even when the DLL's dialog is displayed. Do "K8055 apiVersion" again and notice the clock has stopped. Close the dialog and the clock starts again. This occurs because Squeak runs in a single thread and nothing else can happen while the DLL has control. This fact has more subtle implications because at this stage we don't know if the other functions provided by the DLL simply accept a request and immediately return or, more likely, complete the full request before returning. It's almost certain that that the latter case applies especially where a return value is specified. Even with no return value the situation is not clear. For instance, does "SetAnalogChannel()", which has no return value, send the data to the card before returning? Most likely it does and this implies a small but significant delay while data is transferred over USB to the card and this applies for all calls everytime they are used. The implications of this will depend on your particular application. Dealing with "blocking" is possible but beyond the scope of this tutorial. For now we note the issue and ignore it. The sun has turned a funny maroon colour but we are still deliriously happy.
Now with an actual card plugged in we can try out some of the other methods using a simple test (I added this as a class method in the "test-api" category). Adapt this method or create another to test other features of the card. Call using "K8055 testDevNumber: <your-card-address>"...
testDevNumber: devNum
	"simple test (needs card plugged in)"

	| d |

	self apiCloseDevice. "in case previous usage failed to reach CloseDevice"

	Transcript cr; show: 'Opening device #', devNum asString; cr.
	(self apiOpenDevice: devNum) ~= devNum ifTrue: [
		Transcript show: 'Error: Could not open device!'; cr.
		^ 'failed'.
	].

	d := Delay forMilliseconds: 500. "to slow things down so observable"

	"Turn on all digital outputs then turn off"
	Transcript show: '  Testing apiSetAllDigital'; cr.
	self apiSetAllDigital.
	d wait.
	Transcript show: '  Testing apiClearAllDigital'; cr.
	self apiClearAllDigital.
	d wait.

	"Sequentially turn on digital outputs then turn off"
	Transcript show: '  Testing apiSet\ClearDigitalChannel'; cr.
	1 to: 8 do: [ :i |
		Transcript show: '    Set/Clear: ', i asString; cr.
		self apiSetDigitalChannel: i.
		d wait.
		self apiClearDigitalChannel: i.
		d wait.
	].

	Transcript show: 'Closing device #', devNum asString; cr.
	self apiCloseDevice. "do this else next OpenDevice fails (unless CloseDevice used as above)"

	^ 'success'.
The K8055 class is perfectly usable in your own projects as it stands but doesn't represent a very sophisticated interface for higher level Smalltalk code. How you package this API depends on what you ultimately want, eg, you may be aiming for methods such as "isMyDoorOpen" or "turnFanOn" (but please not "fullyExtractAllControlRods")... so high level that the API becomes transparent. Me, I'm taking a break, basking in the sun and pondering my next step, emulation and making up for some of the deficiencies in the API.
I return and experiment further. With one card set to address zero, plug it in and do a print it on: "K8055 apiSearchDevices". It correctly returns "1" but do it again and it returns "0"! I seem to remember libUSB also exhibits this problem so maybe the cause lies in Window's USB driver code. Whatever the cause we cannot rely on apiSearchDevices to reliably detect a device, especially to detect if it is inserted or removed. The following code gets around this problem and is designed to preserve the current device...
deviceExists: devNumber
	"Checks to see if specified device exists while preserving current device"

	| prevCrtDev devExists |

	prevCrtDev := CrtDev.

	self apiCloseDevice.
	devExists := ((self apiOpenDevice: devNumber) = devNumber).

	CrtDev := self setCurrentDevice: prevCrtDev. "Restore previous Current Device"
	^  devExists
The method "setCurrentDevice:" is a small wrapper around the API call (see below) and maintains the class variable "CrtDev". With this and "deviceExists:" we now know what devices are available and which one is current. The Monticello package also contains simple wrappers for all the other API calls and some extra device related methods that may be useful outside testing. This is enough to move to the next stage.
setCurrentDevice: devNumber
	"Attempts to set the current device, store result and return true/false"
	CrtDev := self apiSetCurrentDevice: devNumber.
	^ (CrtDev = devNumber)
4. Device Emulation
By "device" I am referring to an actual K8055 card. By "emulation" I mean to be able to address a card or features that do not exist. At this stage "emulation" boils down to representing the outputs because the API does not provide functions to read outputs. Simply caching the outputs would probably be sufficient for the purposes of this tutorial but beyond this it may be useful at some point to simulate the equipment the device is connected to and this also implies emulating the K8055. By the way, there's nothing much to "simulate" regarding the K8055 as the card is pretty much dumb, ie, there is no internal/independent control function and in fact it cannot be used independent of the computer because it is powered via the USB port. Even without thinking about simulating external equipment it's still wise to cache the I/O at this level when switching between devices, saving replicating this function several times in code elsewhere. Yet another reason for doing it at this level is it provides an ideal place to attach, for example, an "input/output function" to actually simulate external equipment and/or to perform checks that certain combinations of I/O are rational (read as "safe"). Convinced? Hope so :-)
As noted at the top of this tutorial it is arguable whether to implement "device" as a class at all because it is perfectly possible to use I/O on the same card for independent functions, possibly by two or more objects (note this raises "ownership" issues). Conversely, "device" as a class offers the benefits mentioned above plus it may allow I/O transfers to be streamlined, eg, performing one "writeAllDigital:" periodically instead of individual "set/clearDigitalChannel:" as and when demanded (timing issues?). Your app... you decide :-) By stating the intended aim of this tutorial, ie, recreating the diagnostic program, I deviously avoid these issues :-)))
5. Some Head Scratching
Being a novice to OOD/OOP I have a dilemma: do I add to the existing API class or create a seperate "K8055Device" class or maybe I need several more classes... and does it even make sense to subclass the API? I don't know for sure and welcome any comments but I suspect there is no "correct" solution, just one that fits the circumstances. So I offer the following interpretation:
The API represents a communication channel, not a device and not individual i/o. The obvious representation that makes sense at the user/programmer level is that of an individual card. However, because of its design, access to the API clearly needs to be managed if excessive/redundant calls are to be minimised, eg, card selection calls, maybe analogue i/o quicker than ADC/DAC's conversion time or even i/o request more frequent than USB can service them. Note this is true even for a single card. From the perspective of application code, the appropriate representation may be one or several individual cards (as per the diagnostic program being replicated later) or a bunch of individual i/o channels without any actual reference to individual cards (the more likely case for real applications). In both cases it seems fair for application code to expect transparent i/o updates, ie, in the same way that calling the method "apiSetDigitalChannel:" does not require a subsequent "update-all-outputs" then neither should high level application code.
The above statement is my interpretation and yours may differ so I am reluctant to start adding to the "K8055" class. It does however seem reasonable to subclass "K8055" because in effect we are extending the API. The statement is also fairly application-agnostic so any design based on it should have general utility without being so general that yet more subclassing is required to do something useful (at least satisfying my desire to clearly decouple GUI from K8055 specific code). Onward we march.
(NB: I sincerely hope all of the above is not too verbose and that for beginners, like myself, it helps to make the design process more explicit and open to debate. It is also my little challenge to the often used dictum that Smalltalk code is "self documenting" when we all know that code only really documents what has been done, not what was intended or even why something has been done in one particular way and not another... don't we?)
6. Squeak Interface
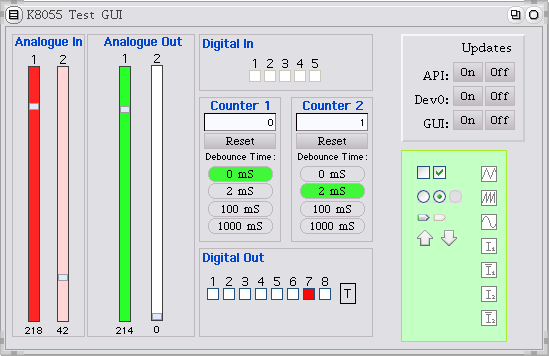
10th April 2008: Package update on SqueakSource includes block-io class which is used by the attached "GUI" morph (K8055TestGUI.morph). Not complete but enough to expand for your own use. Only tested for Card#0 but easy to adapt for other cards because block-io treats all four possible cards as one whole block, eg, digital inputs mapped to 1..20, analogue io to 1..8, etc. Right most stuff is WIP except to get things running you want to turn on Dev#0 and GUI updates.
NB: Had various problems in different squeak versions and even in same the squeak version (saving/loading as a project for instance) hence consider this demo abandoned. However let me know if you run into a problem and I will do my best to help.


