WeatherStation
Last updated at 10:11 pm UTC on 16 October 2023
Why did I do this?
I signed up for a KickStarter for some weather station hardware for a Pi. Because you do.

Hardware
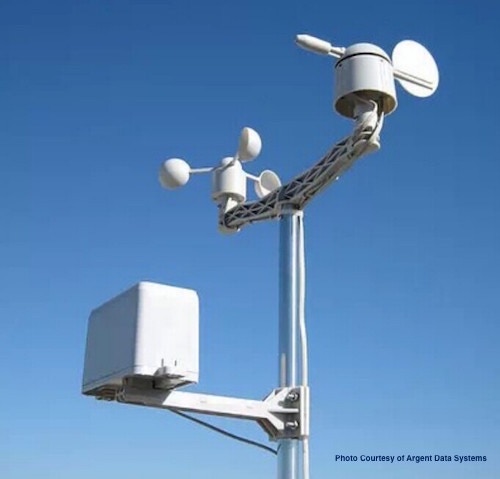
For the record it was this package - https://www.kickstarter.com/projects/sunair/diy-weather-on-your-raspberry-pi-weather-weather/description but unfortunately SwitchDoc has stopped producing retail items as of 2023. It's fairly decent hardware, based on a standard and very simple outdoor wind/rain sensor etc. that you can find on amazon & aliexpress etc. The Grove connectors system is a nice way of quickly assembling electronics without too much fuss. In fact it is such nice stuff that I decided to keep it for other usages and hardwired the sensors instead. Since the 'weather pi' is in a tupperware box in the peak of my garage it doesn't matter a lot if it doesn't look cute. The key item in the package was basically a simple Pi HAT pcb that provided wuitable connectors for the wind/rain unit etc.
Recently much more interesting weather sensors have become available for sensible prices; they use ultrasonic plate sensors to detect the wind speed and direction with no moving parts. I understand that the more sophisticated industrial equivalents can detect rain from the sounds of the drops hitting the plate. If you're interested, take a look for things like "RS485 Ultrasonic Wind Speed and Direction Sensor".
You could also use an arduino or Raspberry Pi Pico, or ESP32 for the main outdoor controller - hell, even an old PC.
Indoor sensors too
To add some extra fun I wanted indoor sensors for temperature and humidity to place around the house. Most people would probably start jumping up and down chanting "Arduino! Arduino!" like fans at a feet ball joust but there is actually a rather better answer these days in the ESP8266 which provides a surprisingly high performance 32bit cpu, a modicum of RAM, some flash storage and built in wifi at prices in the USD$5 range. See the WeatherStation hardware page for more about these neat little widgets. The ESP8266 is kinda-sorta being replaced with the ESP32, which is even more impressive.
For more info on the hardware - Raspberry Pi, ESP8266s, sensors, etc, see the WeatherStation hardware page.
Software
Weather Pi software
Of course once I had the hardware I had to do something about software for it. We need some to run on the Pi that all the weather sensors connect to but sadly the software offered as part of the kit was a bit naff to say the least; written in Python, cryptic, not really set up to report any data to anyone. After a lot of messing about I settled on using MQTT to send the data out for any interested subscribers, which of course meant writing an MQTT client for Squeak. A small advantage of the sample weatherboard software being in Python is that there was a downloadable mqtt client available that made it simple to publish the data. I was also able to leverage a fair bit of AdaFruit python code to read the sensors. Working with Python for this made me really, really, happy that I get to use Smalltalk most of the time. The code is available here -
TPR-WeatherBoard-MQTT.py
A side issue of some importance is making the weather pi run the sensor software on boot; whilst it is trivial to use VNC to connect to the pi and open a terminal and start it up, it isn't really how it ought to work. This requires getting to know a (tiny) bit about systemd and 'unit files', which has to count as some of the most bogglingly over complicated time wasting I've ever had to tolerate. There's some detail in LinuxSystemdUnitFiles for the bored and curious. There's also gigglebytes of forum whining about it, all over the net.
MQTT support
You will need access to an MQTT broker, which can be run on pretty much any machine/OS. I loaded mosquitto on one of my zoo of Raspberry Pis but I also tested out a Mac OS version without any issues.
You'll obviously (I hope!) need to edit the Python code to set the name of the MQTT broker you want to publish data to. Depending on your network setup you might be able to create a local dns name like 'mqtt' so that you can move the server without having to mess with editing a bunch of machines later.
MQTT is well worth reading about in order to understand what it can do for you. Fun fact - as far as we can work out, Andy Stafford-Clark (co-inventor of MQTT) had the same office at IBM UKSC in Wiinchester that I did way back when I was an IBM Research Fellow.
The WeatherStation system
The current core software is actually a fairly simple model that connects to the MQTT broker we installed above, gathers the published data, molests it a little, stores it, and makes it available to some PlotMorph graphs. Future work should include using Seaside to publish the graphs etc as a webpage.
Doing stuff with Data
We need to do three things with our sensor data -
- receive it
- store it
- display it
Receive it
In order to get info from MQTT we have to subscribe to a topic and then process whatever we get sent. Those that have read the MQTT documentation will understand about the levels of reliability and the QOS settings on offer; for simple weather data it really isn't worth worrying about anything more than the basic level 1 option.
Subscribing requires that we create a connection to the broker and request data matching a pattern in the topics being published. Since the hardware is publishing data with topics like 'weatherstation/indoortemp/ABCDEFGH' (remember, the ESP8266 units use their UUID) we can subscribe to 'weatherstation/indoortemp/#' and rely upon the '#' wildcard to get access to all of them. Each packet received includes the topic it was published to and a message; for the weather sensors this is normally the string of a temperature or humidity value. To work out what to do with each packet all we need to do is extract the leaf from the topic (the actual sensor id) and convert the message to a number. Since each sensor has some calibration correction we apply that before passing the info on to...
Store it
My initial version simply kept a big array of data as objects encoding the value & type (ie humidity 35%) and sensorID of the source and a timestamp. That works fine as long as you trim it regularly in order to avoid perpetual image size bloat. Since I set the display stuff to show a week's worth of every-ten-minute info I manually trimmmed every weekendend or so. Scanning a big array to find plottable points for each sensor and each type of point is simple enough but it can take a while if you end up with 150,000 points etc.
Recently (after a mere 6 years) I decided to convert things to use a 'proper' database. Since I had been using the PostgreSQL package for work stuff I stuck with that; it also provided a nice learning experience in using the postgres stuff in a 'normal' manner.
Installing a postgresql database is not too terribly complex, at least not on linux, so no details will be added here. If you configure any sort of encryption for your connection you will need to load up suitable crypto packages; that is a fun job left to the student. Note that there appears to be a long list of free cloud postgres database providers that you might also use to test out the sytem - just google 'free cloud postgresql'.
The PostgresV3 package provides fairly simple access to control the database as well as inserting, updating, and fetching data. That will enable us to create tables etc from Squeak code rather than messing with control panels or terminal logins for almost all cases.
Display it
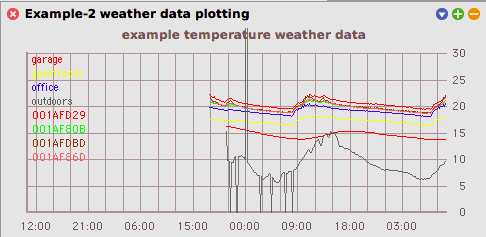
Most interesting weather info is nicely graphable so I use the PlotMorph package (with some recent updates to provide time-range updating) to show the last X hours of data. This is what the last three days of temperature data looks like -

Notice how the dark grey line at the bottom occasionally bounces wildly off-track - that's the AM2315 outdoor unit, which is legendarily awkward to live with. Some days it gives 0 or infinite results half the time, some days it behaves perfectly. The next (red) line up is the temp in my garage as reported from the on-board BMP280, so it is buffer by the insulation of the garage walls. The cluster of lines above that are my various indoor sensors. It's pretty obvious when the heating kicks on!
Sharp-eyed observers will note that the graph lacks data at the left. This is because I managed to lose my prior data during experimenting with something. Never mind, weather is always with us.
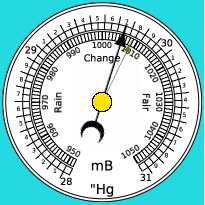
Another nice way to display current weather info is with traditional styled (almost skeuomorphic) graphics mimicking a barometer or thermometer. For that I am using the RotaryDialMorph package. Opps, looks like the barometer is falling, get out the umbrella!
The display system is quite separate from the read & process code; you can run both in the same image or in separate ones. You could run multiple mqtt->database processors in one image, and then have the displaying on a completely different machine.

Loading the WeatherStation package
You will need to install PostgresV3-Core and PostgresV3-Pool as a minimum -
Installer squeaksource project: 'PostgresV3';
    addPackage: 'PostgresV3-Core';
    addPackage: 'PostgresV3-Pool';
        install.
"This is a single file package so just "
Installer squeaksource project: 'MQTTClient';
	install: 'MQTT'.
"Graphing package"
Installer squeaksource project: 'PlotMorph';
	install: 'PlotMorph'.
"Round dials"
Installer squeaksource project: 'RotaryDialMorphs';
	install: 'RotaryDialMorphs'.
"Used to format numbers nicely in the PlotMorph labels etc"
Installer squeaksource3 project: 'NumberPrinter';
	install: 'NumberPrinter'.
Installer squeaksource project: 'Printf';
	install: 'Printf'.
"Finally, the WeatherStation code"
Installer squeaksource project: 'WeatherStation';
	install: 'WeatherStation'.
If you have a postgreSQL server set up with encryption configured you will need to load up some Squeak crypto packages; I use sha-256 and work with
Installer ss project: 'Registers'; install: 'Registers'.
#('CryptographyCore-cmm.11'
'CryptographyASN1-rww.8'
'CryptographyHashing-ul.26'
'CryptographyRandom-cmm.22'
'CryptographyCiphers-cmm.25') do:
	[:pk|
	Installer ss project: 'Cryptography'; install: pk].
Using the WeatherStation
Creating the DB tables
To make accessing the DB simpler, edit the WeatherDataConnectionPool class>>#defaultConnectionArguments
method to point to your database server, database name, etc.
Assuming you have an accessible database server you need to create and set up an actual DB for this project. While logged into the database server, try -
sudo -u postgres psql <<EOF
\set ON_ERROR_STOP 1
create role weatherdata login password 'myPassword';
create database weatherdata;
alter database weatherdata owner to weatherdata;
EOF
If you have installed a tool like pgAdmin4 on your server (which you probably should) you can check that everything has been created.
To test that you have a working server and connection, you can try -
   |conn|
    conn:= PG3ConnectionPool new.
    (conn connectionArguments: (PG3ConnectionArguments new
	      hostname: 'myPostgrSQLServer';
	      port: 5432;
	      username: 'myUsername';
	      password: 'myPassword';
	      databaseName: 'weatherdata';
	      yourself);
                  executeQuery: 'select 3 + 4')
    first " a query may returns multiple result sets, now we select the first "
    rows " we request the rows of the result set "
    first " then the first row "
    at: 1 ." and the first column, this returns the number 7 "
As long as you get '7' things should be good.
The next step is to create two tables; one for the sensors and one for the readings. We will link them by making the sensorid for each reading be a foreign key into the sensors table.
"create the main readings table"
   |conn|
    conn:= PG3ConnectionPool new.
    conn connectionArguments: (PG3ConnectionArguments new
	      hostname: 'myPostgrSQLServer';
	      port: 5432;
	      username: 'myUsername';
	      password: 'myPassword';
	      databaseName: 'weatherdata';
	      yourself).
conn executeQuery:
'create table public.readings (readingID SERIAL PRIMARY KEY, dateAndTime timestamptz, sensorID text, type text, value real)'.
"create the sensors table"
conn executeQuery:
'create table public.sensors (sensorID text PRIMARY KEY, name text, lineColor text, offsets json)'.
"make the readings table have the sensorid as a foreign key into the sensors table"
conn executeQuery:
'ALTER TABLE public.readings ADD CONSTRAINT constraint_sensorid_fk FOREIGN KEY (sensorID) REFERENCES public.sensors (sensorID)'.
This would be a good time to save your image.
Initialising the sensors list
Before we can connect to the MQTT broker and start accepting any readings we need to build the list of sensors and their id->name mappings, calibration offsets and graph line colours. That list needs to be written to the DB as well as being available within the application. The first step is to inspect the default instance of WeatherStation.
WeatherDataHandler new
    dbConnectionSettings: (PG3ConnectionArguments new
	      hostname: 'myPostgrSQLServer';
	      port: 5432;
	      username: 'myUsername';
	      password: 'myPassword';
	      databaseName: 'weatherdata';
	      yourself);
    explore.
To build the list we simply evaluate a bunch of clauses like this in the inspector
(self sensorAtID: #'001AFA61')
	commonName: #guestroom;
	setOffset: #temp to: -0.5;
	setOffset: #humidity to: 3.2 ;
	lineColor:  (Color r: 1 g: 1 b: 0.5).
for each of your sensors. If you miss a sensor or two don't worry, the system will add an entry for the previously unknown sensor ID but with default values. You can edit them later.
To save the sensors to the DB
self dbConnection executeTransaction:
	[:conn|
	sensors do:
		[:sensor|
		conn executeQuery: sensor pg3InsertQueryString]].
Setting the MQTT broker
Still in the inspector on the WeatherDataHandler instance -
self mqttServer: 'NAMEOFYOURBROKER' port: nil.
Usually you just need to set the broker machine name but you can optionally set the port number too. Just remember it has to match your MQTT broker settings!
Configuring subscriptions
The core work done by the WeatherDataHandler class is
- setting up subscriptions
- handling the incoming data
- writing to the DB.
Sample code can be found in WeatherDisplay>>#subscribeToIndoors etc. suited to my own setup.
The simplest subscription method is MQTTClient>>#onTopic:do: which expects a string that describes the received topic and a two argument block that will be passed the incoming topic string and the raw message. What you do with those defines what happens; remember the message is a plain bytearray and if you expect numbers (as we do here) you must appropriately convert the bytes. Messages can be very large, up to 260Mb, but here we are not expecting anything so exotic.
Since the messages being published by all the weather sensor are simple numeric values with topic strings that identify the sensor, there are a couple of useful methods provided in WeatherDataHandler to extract the sensor ID and optionally convert the messsage to a suitable number; see WeatherDataHandler>>#sensorFrom:andData:do: and WeatherDataHandler>>#sensorFrom:andNumericData:type:do:. The latter passes the derived sensor, numeric value and reading type to a block that we then use to add the data to the DB.
WeatherDataHandler>>#subscribeToStatus is perhaps the simplest subscription that does anything useful; it updates the DB row where each sensor records its most recent status and the time/date it was last updated. This is mostly used to monitor my septic tank pump power line (you don't want your pump to stop working...) but could equally be used to monitor door or window open/closed status, buttons being pressed, rain being detected, whatever.
Starting the readings
With sensors loaded, subscriptions configured, the broker specifed, and the DB hooked up, all that is left to do is self connectToBroker.
You might also try self debug: true.
which will cause some possibly helpful info to appear in a Transcript. Should you need to disconnect from the broker, usemqttClient disconnect.
Displaying your data
WeatherDisplay new
    dbConnectionSettings: (PG3ConnectionArguments new
	      hostname: 'myPostgrSQLServer';
	      port: 5432;
	      username: 'myUsername';
	      password: 'myPassword';
	      databaseName: 'weatherdata';
	      yourself);
    explore.
will open an inspector window on a new display UI; it needs that same basic database connections details as the data handler but you can use a different user account. This makes it practical to create a 'public' read-only account that is unable to alter the DB setup or add new data.
self openMainWindow
will create the basic UI with a set of PlotMorphs that show the temperature, humidity, pressure, rain, and wind values over the last 7 days (or whatever duration is set in WeatherDisplay>>#defaultTimeSpan). The plots respond to a couple of keypresses
- a cycles through some options for showing the points with or without labelling
- + cycles through showing various cross-hair types
Settings file
The system will try to read a normal ExternalSettings file ('weatherStationSettings', in the default settings directory - see ExternalSettings class>>#preferenceDirectory etc) that can hold some defaults suited to your environment. For example:
dbHostName:postrgesql-server.local
dbUserName:weatherdata
dbUserPassword:weatherpassword
dbName:weatherdata
mqttServerName:mqttbroker.local


